 |
| Source |

Thursday, November 24, 2011
Thanksgiving wishes
I would just like to take this moment to send my best wishes to all of the families celebrating Thanksgiving today.
Happy eating everyone and enjoy those sweet potaoes and pecans ....
Sunday, November 20, 2011
Now for the Key
Since I am in full-blown gallery-wall-creating-mode, I have another frame to share with you:
I don´t remember where I got this little key from. Only that I found it in between all the stuff I went through for our international move.
Since it didn´t take up too much space in a suitcase, I decided to take it with me.

Together with a few other supplies, I created another little frame incoorporating the color scheme for my son´s room.

I just cut some more of the scrapbook-paper to size, then I added some blue ribbon to the key, and attached this to the back of the frame´s back support.

Here is the finished product:

And here it is among its fellow frames:

What do you think?

Linked up here:
Tuesday´s Treasures
Frugal Friday
Before and After Party
Thursday, November 17, 2011
The Money Saving Mom´s Budget
Here is quick reminder that the Money Saving Mom´s Budget is available for pre-order on Amazon. I have been reading her blog for over a year now, and all of the tips I got throughout the last year were awesome. She introduced me to the drugstore game, shopping according to lists, meal planning and much more.
I am pretty sure that all of this knowledge combined in one handy book is great to have.
If anybody is interested in purchasing the "bible of household finances", here is the link:

If anything, it for sure will be worth to pay a visit over on www.moneysavingmom.com because you´ll learn a lot from Crystal and her family´s story.
I am pretty sure that all of this knowledge combined in one handy book is great to have.
If anybody is interested in purchasing the "bible of household finances", here is the link:
If anything, it for sure will be worth to pay a visit over on www.moneysavingmom.com because you´ll learn a lot from Crystal and her family´s story.
Tuesday, November 15, 2011
Displaying a babyshower-invitation
Next up for the gallery wall: Framing my son´s babyshower-invitation.
All I needed was the invitation, a navy-blue picture frame, and some scrapbook-paper.

I cut a piece of the scrapbook-paper to size:

And then I assembled the whole thing:

Here is my frame among all the other wall gallery items:

I am still thinking about what I will do next, but I´ll let you know when I get there.
Linked up here:
- House of Hepworths
- Before and After Party
Sunday, November 13, 2011
Even more Art for the Gallery
For now, my knit-scarf hasn´t gotten very far (zero rows to be exact), but I did start another project for my son´s wall gallery. First up, here are my inspiration pictures:


I love the simple message of this line - a few words are all that are needed.
However, for my son´s wall gallery, I wanted this to be happier and decided to switch up the colors just a bit:

Here is the my version as I created it in Word. I used Tahoma script in size 90 and bold. Then I centered the words and colored the letters randomly but still following my overall color scheme.
Next, I printed a copy and went to the store to get a nice large picture frame and a block of greenish scrapbook-paper.

Once my art was framed, I decided I liked this project without the scrapbook-paper. Here is the finished product:

Linked up here: Metamorphosis Monday
House of Hepworths
Before and After Party
I love the simple message of this line - a few words are all that are needed.
However, for my son´s wall gallery, I wanted this to be happier and decided to switch up the colors just a bit:

Here is the my version as I created it in Word. I used Tahoma script in size 90 and bold. Then I centered the words and colored the letters randomly but still following my overall color scheme.
Next, I printed a copy and went to the store to get a nice large picture frame and a block of greenish scrapbook-paper.

Once my art was framed, I decided I liked this project without the scrapbook-paper. Here is the finished product:
Linked up here: Metamorphosis Monday
House of Hepworths
Before and After Party
Thursday, November 10, 2011
The Letter L

Have you seen this jute-letter on pinterest? When I saw it, I had to pin it with the intention of creating one of these for my son´s room.
So the other day I went and got all of my supplies ....

... all of them except for one: I wasn´t able to find a wooden or styrofoam letter anywhere in my town.
At first, I figured I would just order one online, but all of the sites I looked at had higher prices for the letters (plus high shipping costs) than I wanted to pay for this project.
Then yesterday, while throwing away an empty diaper box I realized how I could create my own letter without spending a cent:

Can you see it?

Maybe now?

I cut out 4 L´s (each 25 cm high and 15 cm wide or 10 inches high and 6 inches wide ), layered them, and glued them together to give me one 3-dimensional L.
And all of that for the cost of one empty diaper box.
Next, I got out my supplies: 3 bundles of jute (20 meters each), 1 bundle of blue thick cord, and a small pack of green wood-beads.
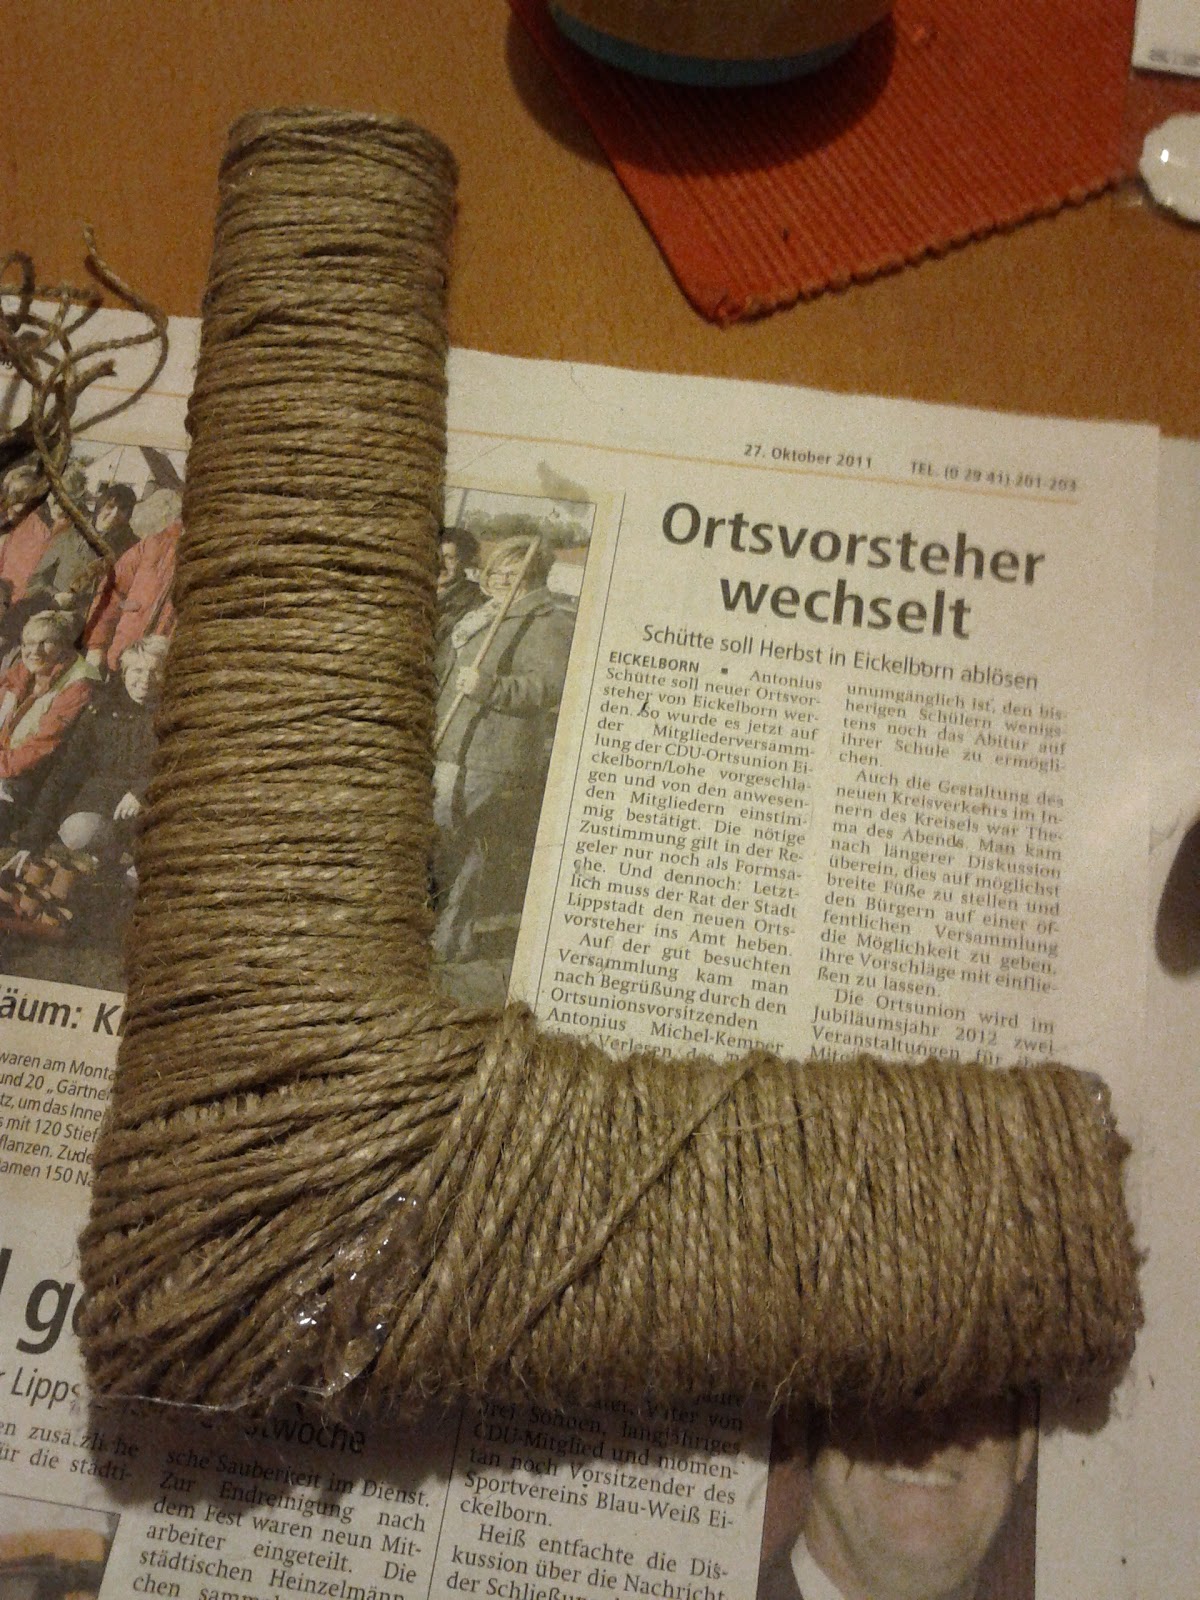
I started by covering the ends with small pieces of jute and attached those with hot glue. Then I just went on and covered the whole thing by wrapping the cord around the letter. Whenever the cord didn´t want to stay put (at the ends and in the "corner"), I used some more hot glue to come to the rescue.
Next, I attached 3 green beads on a small piece of jute and hot-glued those to the letter as well. Once that was done, I used my blue cord to decorate the L a little more.


These will enable me to make this letter part of a wall gallery I am planning for my son´s room.

These are the 3 pieces I have so far. Next time, I work on a letter like this I will try to reduce the amount of jute used in the corners, or increase the amount of jute on the straight parts, so that the entire letter is covered more evenly.
Eitherway, I am happy to move another project from my pinterest boards to the done board.
Linked at House of Hepworths, Metamorphosis Monday and Frugal Friday.
Enjoying fall to the fullest
For some reason the weather last weekend turned beautiful here in our parts of Germany and I enjoyed a weekend full of fun with my son.
Saturday morning we took my older sister´s offer to go to the indoor pool with her. Since she is a volunteer at the local DLRG (a life-savings-organisation), we were allowed to go for free. Good start, wasn´t it?
For my son it was a first going to the indoor pool and he had a lot of fun jumping into the water for an entire hour.

After lunch we decided to make use of the beautiful weather and to visit a small zoo nearby. They have a few larger animals, but mostly its chicken, fish, pigs, rabbits, and the like.

From the rabbits we went on to visit the curious tiny mini pigs.

Next on the agenda: Camels and geese.

The whole zoo started out as a petting zoo at a local farm and has grown for the last couple of decades. I remember coming here when I was still very small.
After watching the different animals, we stoppend at the playground to take a break.


After watching this beautiful moment between mama and baby lama, we went home for cake and tea.
On Sunday the beautiful weather continued, so we went to visit the Biebertal (Beaver-Valley), which is a beautiful valley with a forrest and a lake to go for a walk.

Another break at the playground:

I mean, who doesn´t like to have fun on a playground?

I´ll be back tomorrow with updates on my 2 projects in the making.
Wednesday, November 9, 2011
2 Projects in the making …
There are two things I started working on. Here is a sneak:

Would you like to have a closer look?
Here is Number 1:

In a moment of craziness, I decided that it is time for me to learn how to knit. Last night I spent hours trying to figure out how all this works when you have two left hands and all of the instruction videos on youtube are by right-handed women. I´ll share my “progress” soon.
Project Number 2 includes these items:

I´ll share soon what I am going to do with these items. But maybe the colors are a hint as to whom will be the recipient of my creatitivity ….
Happy Wednesday everyone!!!
Wednesday, November 2, 2011
It´s Pinterest Challenge Time!!!
For the second time this year Katie Bower and Sherry and John Petersik invited all of the DIY-bloggers out there to participate in the Fall Edition of the Pinterest Challenge.
Well, at first I was up for the challege, but had no clue what to work on..... Until Friday evening, when my older neighbour came over and asked me, if I was interested in a little wooden chair for our son. Sure I was.
Off she went to get the little stool from her basement and came back with this:

Here is a snip from my `Boy´s Room` Pinterest board:

As you can see, I decided on making a little time-out-chair from my neighbour´s gift.
I had to think for a while about what I would do exactly with this chair, but then decided on using a bit of an Ikea curtain found a few months ago at the `as is` section for $3.00.
Here is the fabric with all the other supplies I got for about $10.00 at the hardware store:

I started by detaching the ´pretty´ peach colored seat from the 80s:

Then I lightly sanded the wood:

After that I used spray-primer (especially since this was the first time I ever used this brand of spray-paint).

While the spray-paint was drying, I worked on covering the seat with new fabric.

Just make sure you have a bit of fabric overlapping on each side.
Once that was done, I started giving my chair two light coats of blue spray-paint.

(This was after the first coat)

Here you can see the chair coming together, but maybe you can also see from the picture that the white primer was coming through the blue. I decided to let the paint cure over night and to get on another 1 or 2 coats the next day. (Yes, I had to go out and buy another bottle of spray for that plan).
Once all that was done and the paint had time to dry another night, I reattached the seat to the base. Ready for the small reveal?
Here is the chair before and after:


How cute is that? For sure this chair is going to fit right in with the color scheme I have in mind for my son´s room. Here is another close-up of the seat:

For sure I love how the chair turned out and the Pinterest Challenge is accomplished :).
Linked up at the Pinterest Challenge, November Before and After Party, Frugal Friday and Show and Share Day.
Subscribe to:
Posts (Atom)